Revit Views: Types, Visibility and How Firms Keep Them Consistent
The kinds of Revit views, what decides what each one shows (view range, Visibility/Graphics, filters, templates) and how firms keep views consistent.

A Revit view is a window into the one model: a floor plan, ceiling plan, elevation, section, 3D view, drafting view, legend, schedule or sheet. What each view shows is set by a stack of controls: view range, Visibility/Graphics, filters, the view template, the crop region and anything hidden. When something is missing, one of those controls is hiding it.
This guide covers the kinds of views available in Revit, each control that decides what a view shows, the order to check them in, and how firms keep hundreds of views consistent. Mira, a free AI agent for Revit, can list what's hidden in a view for you.
Types of views
Most views start from View tab › Create panel, and each kind shows the model a different way. When you draw the model, every view below shows it from its own angle:
- Floor plans and reflected ceiling plans cut the building horizontally at a set height. Plan Views › Floor Plan or Reflected Ceiling Plan.
- Elevations look at the building's faces from a marker you place in a plan. See how to add an elevation.
- Sections cut through the building along a line you draw. See how to create a section view.
- Callouts enlarge part of a plan, section or elevation at a larger scale.
- 3D views show the model in axonometric (default 3D) or perspective (camera). A section box cuts one to a single floor. See how to create and lock a 3D view.
- Drafting views are 2D only, with nothing from the model in them.
- Legends and schedules list symbols, types and element data. Unlike other views, they can sit on more than one sheet.
- Sheets hold the other views for printing, from View tab › Sheet Composition panel › Sheet.
To make another view of the same kind, right-click a view in the Project Browser and choose Duplicate View. Each copy then has its own settings, which is where views start to drift apart.
What determines what a view shows
Each view has its own settings, and each setting can hide part of the model. Here are the controls, roughly from the most common cause of a missing element to the least.
View range
The view range decides what a plan shows above and below its cut. Top, Cut Plane, Bottom and View Depth set where Revit cuts walls and what it draws in projection. Open it with Edit next to View Range in the Properties palette, or type VR. Sections and elevations use a far clip instead. Here's how to change the view range.
Visibility/Graphics
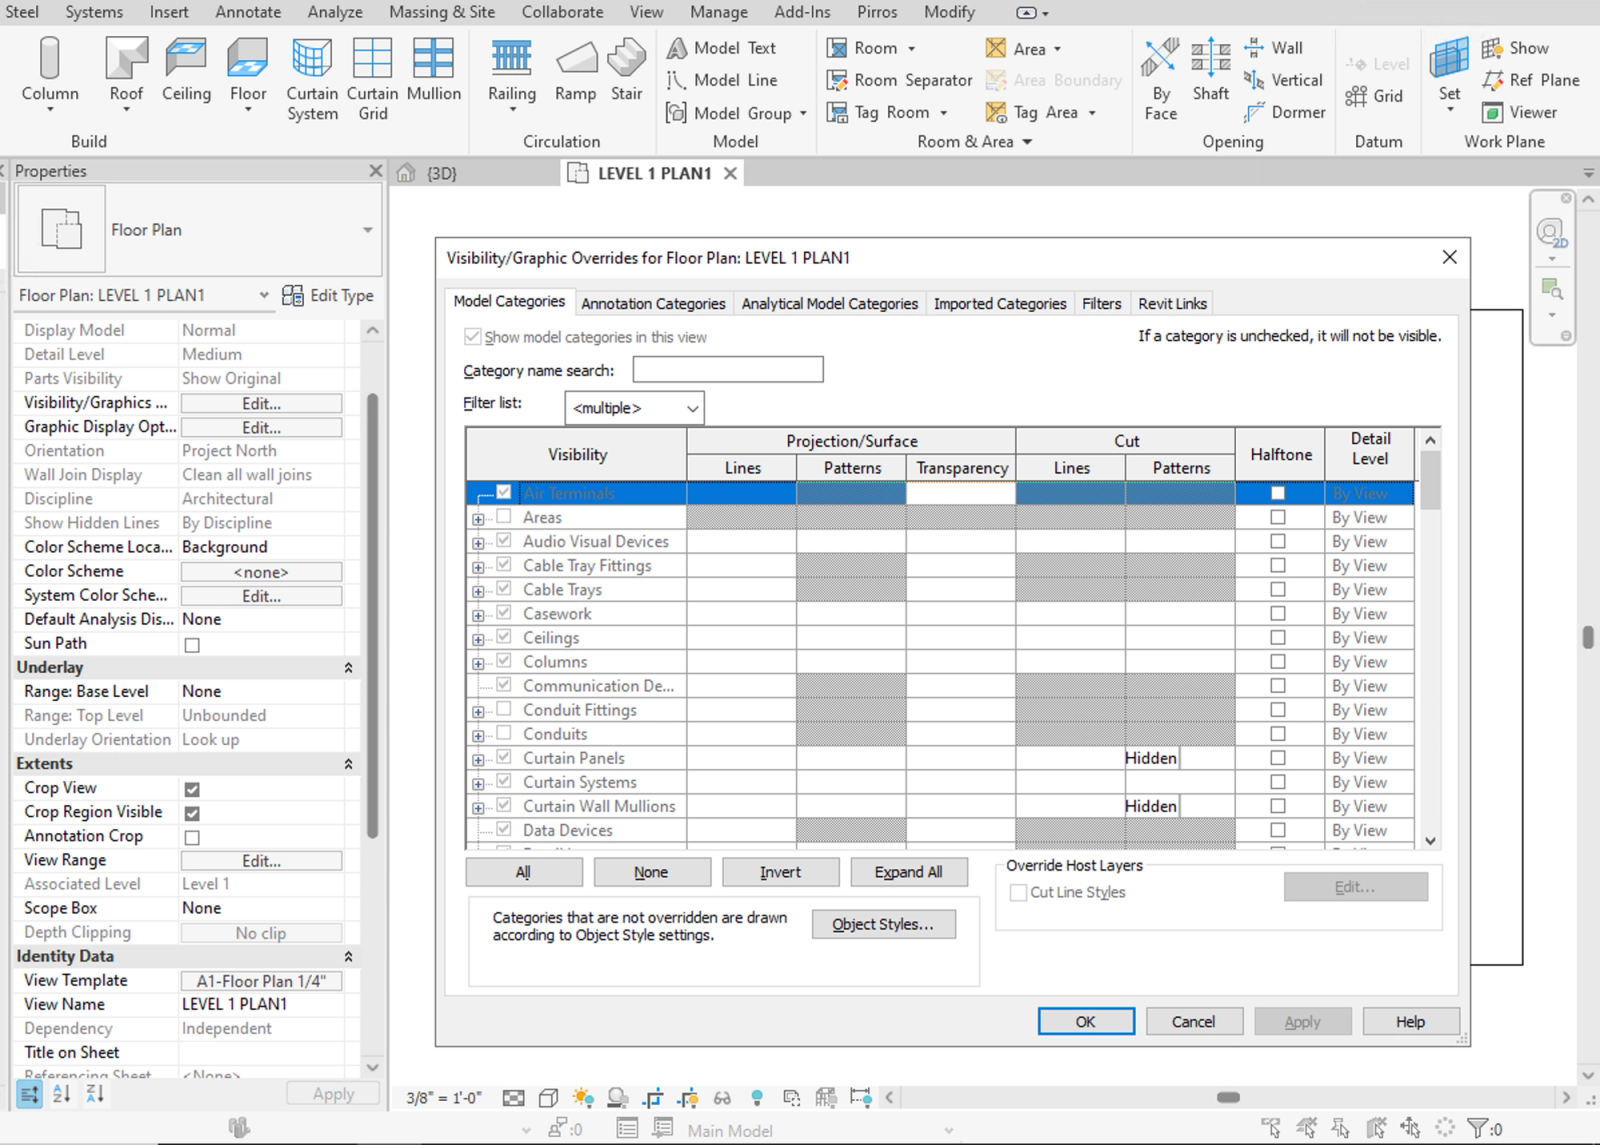
Visibility/Graphics turns each category and subcategory on or off for one view, and overrides how it looks. Open it with VV or VG. Its tabs cover model categories, annotation categories, imported CAD, filters, linked models, and worksets and design options when the project has them.
View filters
A view filter changes how elements matching a rule look, or hides them. A filter on fire rating can turn every rated wall red. Filters are listed in order on the Filters tab of Visibility/Graphics, and the one highest in the list wins. Here's how to use view filters.
Scale and detail level
Scale and detail level decide how much of each family draws. Many families show more geometry at Fine than at Coarse, and some show nothing at all at the wrong level. Detail level can also be set per category in Visibility/Graphics.
Crop region and scope boxes
The crop region sets the edges of the view. An element outside it doesn't show, and an annotation shows only if it sits entirely inside the annotation crop. A scope box sets the crop for every plan assigned to it, and grids assigned to a scope box show only in views that cut through it. To turn one plan to an angle, rotate its crop region; here's how to rotate a view.
Phases, worksets and design options
The view's Phase and Phase Filter decide which existing, new and demolished elements show, and how. In a workshared model, a workset can be hidden in a view, and a closed workset hides its elements everywhere. Elements in a secondary design option show only in views set to that option. Here's how to use phases, how to set up worksets and how to use design options.
Line weights override
Line weights change how an element looks, not whether it shows. They come from four places: the Line Weights table, Object Styles, Line Styles, and overrides in the view. Here's how to set line weights.
Why can't I see it?
When something is missing from a view, a visibility setting is almost always hiding it, and checking in the right order finds it fastest. Autodesk's own checklist covers the same ground (Autodesk Help: Objects Are Not Visible). Work down this list:
- Reset temporary hides. Click Temporary Hide/Isolate (the sunglasses on the View Control Bar) › Reset Temporary Hide/Isolate, or type HR.
- Reveal hidden elements. Click the light bulb on the View Control Bar, or type RH. Anything hidden in the view, whether by element, by category or by a filter, shows in color.
- Check the category. In Visibility/Graphics, make sure the element's category and subcategory are on, and look at the Filters tab for a filter that hides it.
- Check the view range. In a plan, the element may be above Top or below View Depth. In a section or elevation, check the far clip.
- Check the crop. Turn on the crop region and see whether the element sits outside it.
- Check the detail level. Switch to Fine. Some family geometry only draws at certain levels.
- Check the phase. Set Phase Filter to None for a moment. If the element appears, the phase settings were hiding it.
- Check worksets, design options and links. Make sure the workset is visible and open, the view shows the right design option, and any linked model is loaded and visible.
- Check the Discipline. The view's Discipline setting can stop some elements from displaying as expected.
Reveal mode only shows what visibility settings and filters hide. If the light bulb shows nothing, the cause is further down the list.
View templates
A view template is a saved set of view settings that many views follow at once. It can control scale, detail level, Visibility/Graphics, filters, view range, phase filter and more. Each property has an Include box, and the template controls only the properties you include.
- Assign, don't just apply. Assigning a template through a view's View Template property links the view, so later changes to the template reach it. Apply Template Properties copies the settings once, and the view won't follow later edits.
- Gray means the template owns it. When a property is grayed out in the Properties palette, or Visibility/Graphics won't let you change a category, the assigned template controls it. Change it in the template, clear Include for that property, or set the view's template to <None>.
- Set the default for new views. In a view type's properties, View Template applied to new views gives every new view of that type the template.
- Check the reach before you edit. Manage View Templates shows how many views use each template. Every one of them changes when you edit it.
- Step outside a template for a moment. Click Temporary View Properties on the View Control Bar. Enable Temporary View Properties lifts the assigned template so you can change the view freely, and Temporarily Apply Template Properties previews a different template. Restore View Properties puts the view back as it was.
Here's more information on how to create and apply view templates.
Views drift apart across projects
Views set up by hand frequently drift apart, both inside a single project and across a firm. View templates exist to stop that, but only for the views assigned to them. Nothing in Revit flags drift, which causes these drifts to persist throughout design development. Here are some common examples:
- Views with no template. Views made before the template existed, copies of a view that had none, and views set to <None> "for a minute" never follow later changes.
- Per-view overrides pile up. Someone lightens furniture in one plan with an element override. Nobody can see it from the outside, and filter and category settings don't catch the override.
- Hides travel with copies. When you duplicate a view, its hidden elements come along, so a furniture plan and a life safety plan can each be missing something nobody remembers hiding.
- Cut heights differ by floor. One person drops a plan's cut plane to catch a high window, and the set ends up with walls drawn cut on one floor and in projection on the next.
- Each project uses its own templates and filters. One project's fire-rating filter is called "Fire Rated". On another project, the same filter is called "Fire Walls" or "FR - 2HR". And each uses slightly different rules and colors, so the same exact wall shows red in one set and grey in the next.
- Scope boxes multiply. "Scope Box 1" through "Scope Box 14", some unused and some nearly identical, and a plan set to the wrong one crops off part of a floor.
Each of these issues is a quick fix in one view. The trouble is finding them across hundreds of views before the set goes out. When templates and filters have forked between projects, Transfer Project Standards copies one project's set into another.
Doing it well
Firms that keep views consistent decide the settings once, in the template every project starts from, and assign them instead of setting views up by hand:
- One named set of view templates. One per kind of view the firm issues, such as floor plan, enlarged plan, reflected ceiling plan and building section, in the firm's project template.
- Assign templates, and set the defaults. Assign templates rather than applying them, and set View Template applied to new views on each view type so new views start right.
- Put filters in templates. Use filters inside templates for rule-based graphics, and keep element overrides for true one-offs.
- Hide by category in the template. Hiding by category, rather than element by element, lets the next person see what's hidden and why.
- Name scope boxes for what they cover. "Area A" and "East Wing" instead of "Scope Box 7".
- Check before each issue. List the views with no template, and look for overrides that shouldn't be there.
- Purge at closeout. Delete unused view templates and filters before the model becomes the starting point for the next job.
How Pirros helps
Pirros, the AI project hub for architects and engineers, keeps the details and families every project starts from in one place, as firm standards everyone can find. Inside Revit, Mira, Pirros's AI agent, takes on the view-by-view work.
Mira handles the repetition; you approve the result
Mira works in the model next to you. It reads the views first and changes nothing until you approve:
- Find what's hidden. Ask "Show me everything hidden in this view and unhide it." Mira lists what's hidden and how, by element, by category or temporarily, without changing anything, and waits for your OK. It leaves filters and the crop region alone, since those are view settings.
- Assign templates. "Set the View Template to 'Architectural Plan' on every floor plan that doesn't have one yet." Mira lists the plans with no template, waits for your OK, and leaves plans that already have one alone.
- Build a filter from one sentence. "Create a view filter that highlights all walls with a fire rating parameter." Mira checks which Fire Rating values your walls use, asks how to treat values such as NR, and shows you the rule before it creates the filter.
- Flip grid heads across plans. Grid bubbles are set per view. Mira shows a before-and-after table of each grid in the current view, waits for your go-ahead, then offers to apply the same setup to your other floor plans.
Mira checks each result after it writes and names anything it skipped, so you know which views still need a person. One Ctrl+Z undoes most changes; a change made across several views can take more than one.
Book a demo to see how Pirros keeps your firm's standards in one place. Working in Revit today? Try Mira free.