Revit Drafting and Annotation: Details, Tags, Text and Sheets
How drafting and annotation work in Revit: detail and drafting views, detail components, tags, keynotes, text and sheets, and how firms keep them consistent.

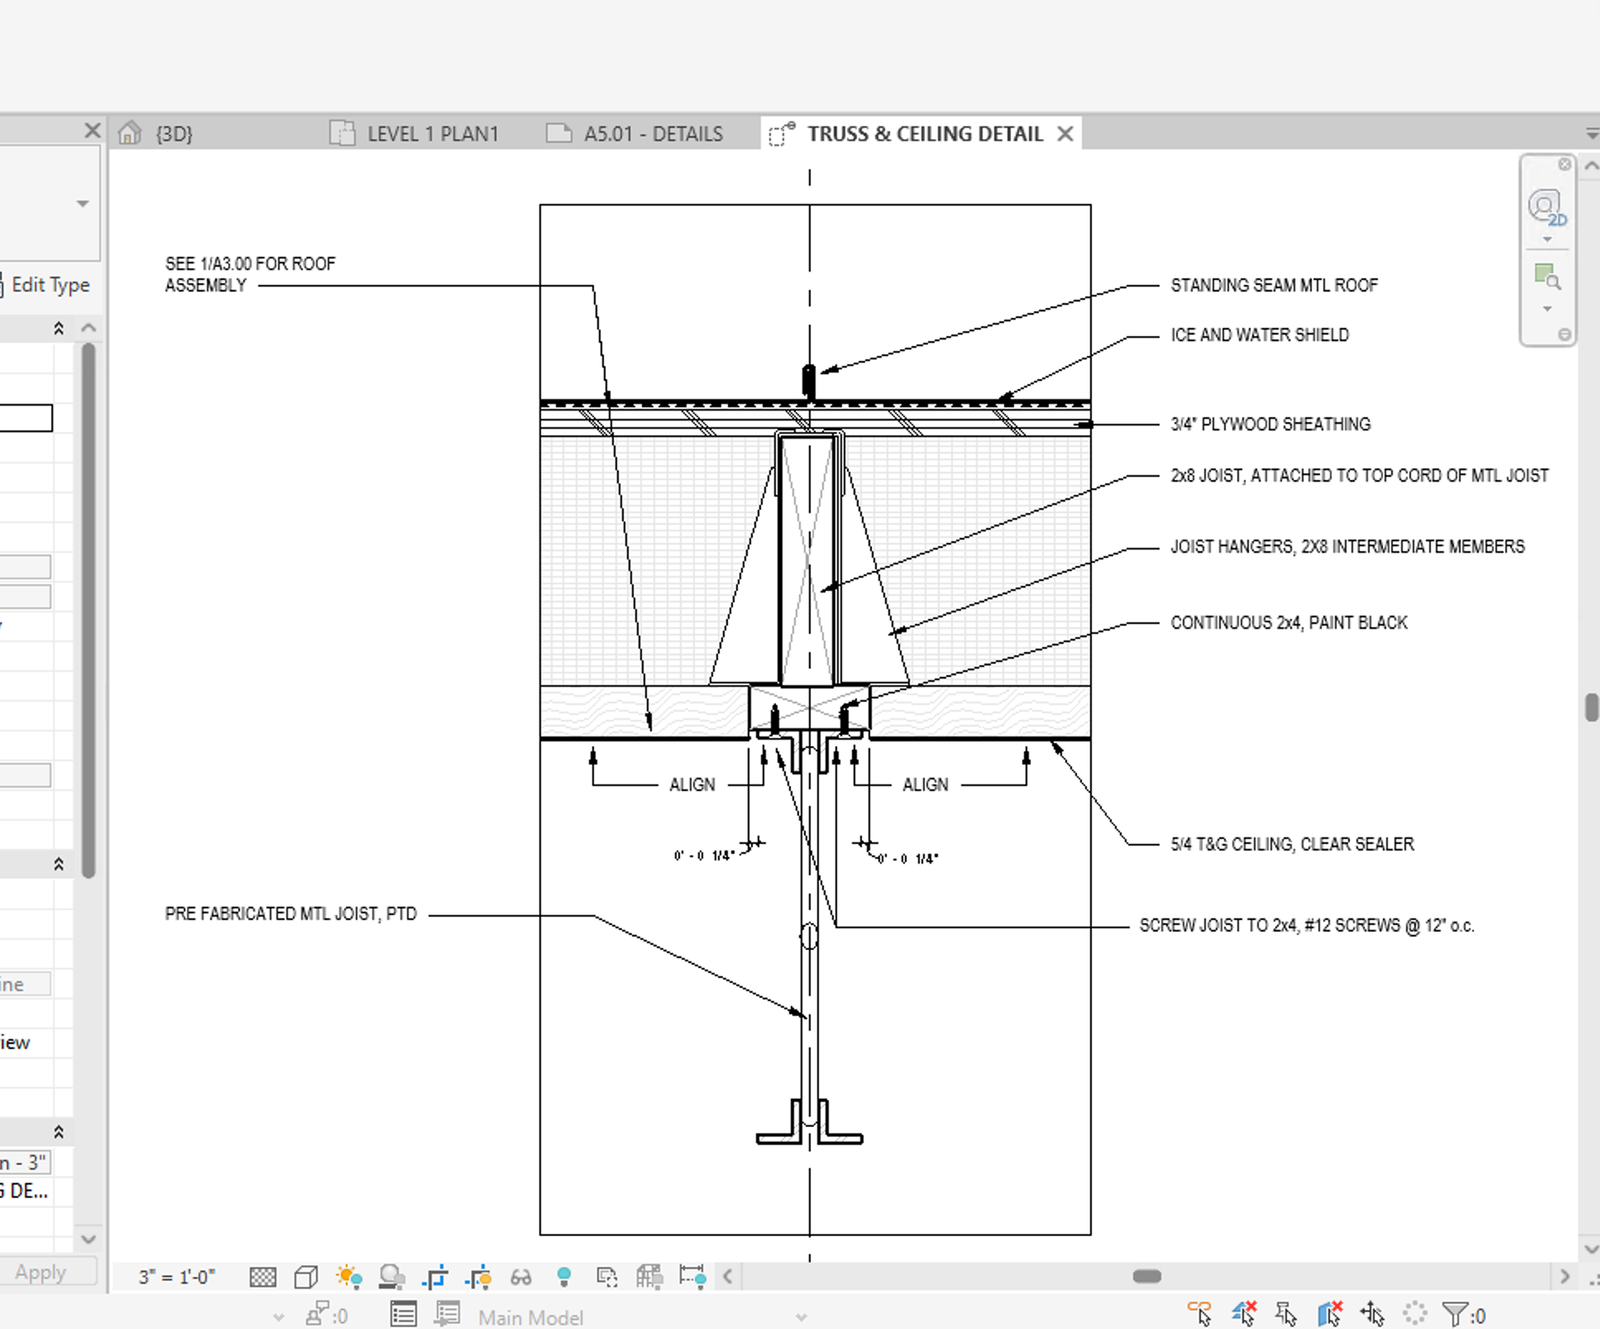
Drafting in Revit is the 2D layer you add to the model: detail and drafting views, detail lines, detail components and filled regions, plus tags, keynotes, text and dimensions, placed on sheets. The model supplies the geometry, but the drafting and annotation explain how the model gets built, one view at a time.
This guide covers how Revit's drafting tools fit together, from the first detail to the finished sheet, and how firms keep annotation consistent across hundreds of views. Mira, a free AI agent for Revit, takes on the repetitive fixes.
Revit detail items and annotations
Model elements appear in every view that can see them, while detail items and annotation belong to the one view that you draw them in. If you draw a wall once, it shows up in every plan, section, elevation and 3D view that cuts or sees it. Draw a detail line, place a tag or type a text note, and it exists in that view only.
The two kinds of 2D elements behave differently on paper:
- Annotation (text notes, tags, dimensions, symbols) is sized to print. A text type set to 3/32" prints at 3/32" at any view scale.
- Detail items (detail lines, detail components, filled regions) are drawn at real size, like the model, so they scale with the view.
Both elements are view-specific. A door tagged in the Level 1 plan is untagged in the enlarged plan of the same room. Every annotated view is its own piece of work, and a set with 200 annotated views is 200 rounds of tagging, noting and checking.
Detail views vs drafting views
A detail view shows the model and stays tied to it; a drafting view is 2D only and has no connection to the model. Most details belong in one or the other, and picking the right one first helps you avoid redrawing later.
A detail view is a callout or section whose type is a Detail View. Start one with View tab › Create panel › Callout or Section, and pick Detail View: Detail in the Type Selector. The model shows underneath; set Display Model to Halftone in the Properties palette to tell it apart from your detailing (Autodesk Help: Create a Detail View). When the design changes, the model geometry in the view changes with it. Your detail lines and components stay where you put them, so check them after a change.
A drafting view, from View tab › Create panel › Drafting View, starts blank at the scale you choose. Nothing in it comes from the model, so nothing in it updates with the model. A callout can still point to one: choose Reference Other View on the Reference panel while the Callout tool is active.
Use each where it fits:
- Detail view: a condition specific to this building that the model already mostly shows, such as a wall section at an unusual opening.
- Drafting view: typical details reused across projects (a parapet, a slab edge, a door head), and anything the model doesn't show, such as flashing laps or fastener spacing.
When you create a detail in Revit, you can view it in a detail view or a drafting view. To reuse a drafting view from another project, use Insert tab › Import panel › Insert from File › Insert Views from File. Where a type name already exists in your project, Revit keeps your project's version, so the inserted detail can print differently from the original. Older details drawn in AutoCAD can also be converted to Revit.
The detailing toolkit
Revit's detailing tools sit on Annotate tab › Detail panel: Detail Line, Region, Component, Detail Group and Insulation. Each one draws in the current view only.
- Detail lines are drawn in a line style, which sets the pen weight, color and pattern. Make your own in Manage tab › Settings panel › Additional Settings › Line Styles. Styles in angle brackets, such as <Hidden>, are Revit's own and can't be renamed.
- Detail components are families in the Detail Items category: studs, blocking, flashing, anchors. You draw one once and place it many times. Because they are Revit families, components carry parameters, can be tagged and keynoted, and can be swapped by type.
- Repeating detail components array a component along a line you draw, for brick coursing or CMU.
- Regions come in two kinds. A filled region hatches an area with a fill pattern, such as concrete, earth or sealant. A masking region covers what's behind it.
- Insulation draws batt insulation along a line, at the width you set.
- Detail groups bundle detail items so you can copy them as a set.
Build with components, not loose lines. A detail drawn in lines looks the same on paper, but lines can't be tagged, keynoted or scheduled, and a change to the product means redrawing every copy. A component is one definition, so the next person places the same stud you did.
Detail groups are quick to make, which carries risks. A group copied from detail to detail gets edited in place along the way, until the copies no longer match. When a group keeps getting reused, it should become a detail component family.
Annotating the model
Annotation explains the model to the people building it. Tags and keynotes read the model; text notes don't. That one difference decides how much work a late change creates.
- Tags read an element's parameters, such as a door's Mark or a room's Name and Number. Change the parameter and every tag of it updates. Annotate tab › Tag panel › Tag by Category (TG) tags one element. Tag All tags every visible, untagged element of the categories you pick, one view at a time; more in how to tag all elements. To put each room's tag at the center of its room, see how to center room tags.
- Keynotes read an element's or material's Keynote value and look its text up in the project's keynote file. A Keynote Legend explains them on the sheet. An element keynote is a type value, so changing it changes every instance of that type. More in how to add keynotes.
- Text notes are plain text. They don't know what they point at, so when a product changes, every note that names it has to be found and edited by hand.
- Dimensions measure the model and update when it moves. You can't type a number over one: if the number is wrong, the model is wrong. More in how to add dimensions.
- Legends show symbols and types with labels. A component in a legend is a symbol, not another element, so it never adds to a schedule's count. More in how to create a legend.
The rule of thumb: tag and keynote from the model wherever you can, and keep text notes for what the model can't say. Rules that apply to the whole set belong in the general notes; not repeated in each detail.
Putting it on sheets
Each view goes on one sheet, and Revit numbers the detail when you place it. Create a sheet with View tab › Sheet Composition panel › Sheet, pick a title block, and drag views onto it from the Project Browser.
- One view, one sheet. A plan, section, elevation or drafting view can sit on only one sheet. Legends and schedules can go on as many as you like.
- Numbers fill themselves in. Revit sets the detail number and sheet number on the view's tag when you place it. Two details on one sheet can't share a number, so renumbering by hand after late changes is a shuffle through temporary numbers.
- Line plans up. A guide grid, or from Revit 2026 a saved position, puts each plan in the same spot on every sheet. See how to align views on sheets.
When annotation drifts from project to project
Over the course of many projects at a firm, it's common for annotation to drift away from the firm standard. The same line style, text type and tag exist in several near-copies, and details arrive from old projects and consultants with graphics of their own. Nothing in Revit flags it, so an incorrect annotation can persist until it becomes an RFI. Here are common annotation drifts:
- Near-copies of styles. Copied details bring "Medium Lines (1)", "MEDIUM-2" and "Thin Lines 2". Some print exactly like yours and some don't, and the name won't tell you which.
- Old details bring old graphics. A detail inserted from a 2015 project brings any text types and fill patterns your project doesn't already have. Its view overrides travel with it too, so it can print heavier than the detail next to it.
- CAD typicals come back every project. Firms that moved to Revit years ago often still keep typicals in AutoCAD, so each project imports and explodes the ones it needs again, with a fresh set of imported styles.
- Text notes go stale. A product substitution means finding every note that names the old product, across dozens of views.
- Detail numbers fall out of order. Late changes leave a sheet reading 1, 2, 5, 3, 7.
- Nobody checks every view. A set can hold hundreds of annotated views. Checking each one against the firm's graphics by hand doesn't happen before every issue.
Drafting and annotating well
The firms that keep drafting consistent treat annotation as a firm standard with an owner, not as something each project sets up. Start here:
- One template, one set of styles. Named line styles, text types, dimension types and tag families in the project template, and no look-alikes.
- Typicals in one place. Keep typical details as drafting views in one location the whole firm searches, so teams insert the vetted version instead of copying from the last job.
- Components over lines. Draw repeated pieces as detail components, and turn a detail group into a component family once it starts traveling.
- Tag and keynote from the model. Keep text notes for what the model can't say, and put set-wide rules in the general notes.
- Convert CAD details once. Rebuild a CAD detail with your own styles, then delete the import and purge what came with it.
- Check graphics before each issue. Line weights, text types and detail numbers, view by view, before the set goes out.
- Give it an owner. The BIM manager decides what the standard is. Everyone else can flag a detail worth promoting.
How Pirros helps
Pirros, the AI project hub for architects and engineers, makes every detail your firm has drawn searchable, including live Revit details. Detail management reads the geometry and the annotation inside each drawing, so you find a detail by the condition it solves ("partition, 1 hour rated, metal stud") instead of guessing a view name.
- The vetted version is marked. Duplicates are grouped, and your firm's approved version of each detail is labeled, so people reach for it first.
- Annotation quality is checked. Each detail gets a health score from nine factors: three programmatic checks and six AI vision checks for crossing leaders, spelling, abbreviation compliance, text overlap, leaders to nowhere and text alignment.
- Standards grow from real work. Architects flag a detail worth standardizing, and an admin promotes it to the firm standards.
At David Baker Architects, designers saved an average of 10 minutes per detail in search and recreation time after implementing Pirros.
Mira handles the repetition, you approve the result
Mira, Pirros's AI agent for Revit, works in the model next to you and takes on the annotation work that repeats view after view. Its skills, published by Pirros, cover the jobs in this guide:
- Annotation standards audit. Ask "Audit this view against our standards" and point Mira to your template file (.rte or .rvt). It summarizes your standards for you to confirm, matches the view's text by size and purpose, and lists ranked options, with how many elements each affects, wherever a match isn't clear. Use it on a detail from an old project, a consultant or a manufacturer.
- Renumber details on a sheet. Mira reads where each viewport's title sits, draws the new numbering for each convention it offers, and waits for you to choose. Labels such as SIM or N.T.S. are pointed out, not overwritten.
- Bulk text-note edits. "Replace Old Material Name with New Material Name in every view." Mira finds every match first, asks whether to keep each note's capitalization and whether to match whole words only, and tells you how many notes will change.
- CAD detail to Revit. Explode the CAD import in a drafting view, then ask Mira to convert it. It rebuilds the detail as native lines, regions, components, text and dimensions, drawn to your project's standards, and the original stays until you approve removing it.
- Detail group to Detail Item family. Mira turns a detail group into a Detail Item family that keeps its nested components, then swaps the family in for the group.
Every skill works the same way: Mira looks first, shows you a preview, and changes nothing until you approve. It checks the result and names anything it skipped, and most skills make the whole change as one step, so one Ctrl+Z puts it back. With the Quality Management System, Pirros's AI-native QA/QC product, Mira can also check the families in a detail against your firm's approved families in Pirros.
Book a demo to see every detail your firm has drawn, searchable by what's in it. Working in Revit today? Try Mira free.