Parapet Walls: What They Do and the Details That Keep Them Dry
What a parapet wall is, the heights codes require, and the details that keep it dry and fire-safe: coping, membrane, blocking and flashing at each condition.

A parapet wall is the part of an exterior wall that extends above the roof. It cuts wind pressure at the roof edge and hides rooftop equipment. It can also act as the guard on a roof deck. Where the building code requires one, it slows fire spreading from one building to its neighbors.
It's also one of the hardest places on a building to keep dry. A parapet is exposed to the weather on three sides. Three systems meet there: the roof membrane, the wall's air and water barrier and, on many buildings, a fire-rated wall. Parapets fail so often that Building Science Corporation has a name for it: "parapetitus."
This guide covers:
- When the code requires a parapet and how tall it has to be
- The common types of parapet walls
- The details at each location: the top, the roof side, the wall side, and the corners and ends.
What a parapet wall does
A parapet is a barrier formed by carrying a wall up past the edge of a roof, terrace, balcony or walkway. On a roof, it's usually the exterior wall continued past the roof line, or a fire wall or party wall carried up through it.
Parapet walls fulfill four key functions:
- Wind. Wind blowing against a building forms vortices at the roof edges, with large pressure differences at the perimeter.
- Fire. If fire breaks through the roof membrane, a parapet blocks flames and radiant heat from reaching the building next door.
- Screening. It hides mechanical equipment on the roof and shapes the building's top edge.
- Guarding. On a roof that people use, like a roof deck, the parapet can serve as the guard.
Fire is the oldest of these jobs on city roofs. London's Building Act of 1707 banned projecting wooden eaves as a fire risk and required an 18-inch brick parapet with the roof set behind it.
When the code requires a parapet
Under the International Building Code (IBC), parapets are the default. Section 705.11 requires them on all exterior walls of a building unless an exception applies. The exceptions cover many buildings, so plenty of the parapets you draw are there for design reasons, not code. Which exception applies, if any, is part of the project's building code analysis.
A parapet isn't required when any of these is true:
- The exterior wall doesn't need a fire-resistance rating based on fire separation distance (IBC Table 602).
- The building area is less than 1,000 sq ft on any floor.
- The whole roof is noncombustible, or rated at least 2 hours.
- The exterior walls are 1-hour rated and stop at the underside of the roof sheathing, and the roof near them is 1-hour rated. That's 4 ft from the wall in Group R and U, 10 ft in other occupancies, or the full span where the roof framing runs perpendicular to the wall. No roof openings may sit within 5 ft (R and U) or 10 ft (others) of the wall, and the whole roof needs a class B covering.
- The building is Group R-2 or R-3, of Type III, IV or V construction, with a class C roof covering. The deck must be noncombustible or fire-retardant-treated wood for 4 ft from the wall, or 5/8" Type X gypsum board must line the underside of the deck for 4 ft.
- Section 705.8 allows the wall to have 25% or more of its openings unprotected.
Fire separation distance and construction type drive most of these. Our guides to fire separation distance, types of construction and fire-rated wall assemblies go deeper.
How tall a fire parapet must be
Under IBC 705.11.1, a required parapet must be at least 30 in tall, measured from where the roof surface meets the wall. The same section sets three more rules:
- Rating. The parapet has the same fire-resistance rating as the wall that supports it.
- Noncombustible faces. On the roof side, the top 18 in must have noncombustible faces, and that includes the counterflashing and the coping.
- Sloped roofs. Where the roof slopes toward the parapet more steeply than 2:12, the parapet must rise as high as any part of the roof within the fire separation distance where wall openings need protection. It's never less than 30 in.
Two questions come up often enough that they're worth taking to the building official. In Type III construction, does the parapet have to be framed in fire-retardant-treated wood like the wall below? Readings of the code differ. And when a parapet isn't required but is built for looks, does it need the rating? Some designers have treated it as an extension of the roof, not the wall, and built it unrated.
A fire wall can need a parapet of its own, too. Our guide to fire walls, fire barriers and fire partitions covers that case.
Guards on roofs people use
If people will use the roof, as on a roof deck or terrace, the parapet may also be the guard. Guards have their own minimum height in the IBC's means of egress chapter (Chapter 10). Check the parapet against that height as well as the fire parapet's 30 in.
Copings are tested for wind
On a low-slope roof, the metal at the edge has to stay on in high wind, and that includes a parapet's coping. Section 1504.5 of the 2018 IBC covers built-up, modified bitumen and single-ply roofs. Their metal edge securement, except gutters, must be designed for wind loads under Chapter 16 and tested to methods RE-1, RE-2 and RE-3 of ANSI/SPRI ES-1.
RE-3 is the coping test. It applies to copings whose exposed top is wider than 4 in, and it loads the face and the top at the same time. The perimeter matters: after several hurricanes in the early 2000s, industry studies found that failure at the perimeter caused nearly 60% of roof system damage. Specify a coping tested to the standard and show its clips and fastening in the detail.
Parapet types
The backup wall changes how you keep air and water out of the parapet.
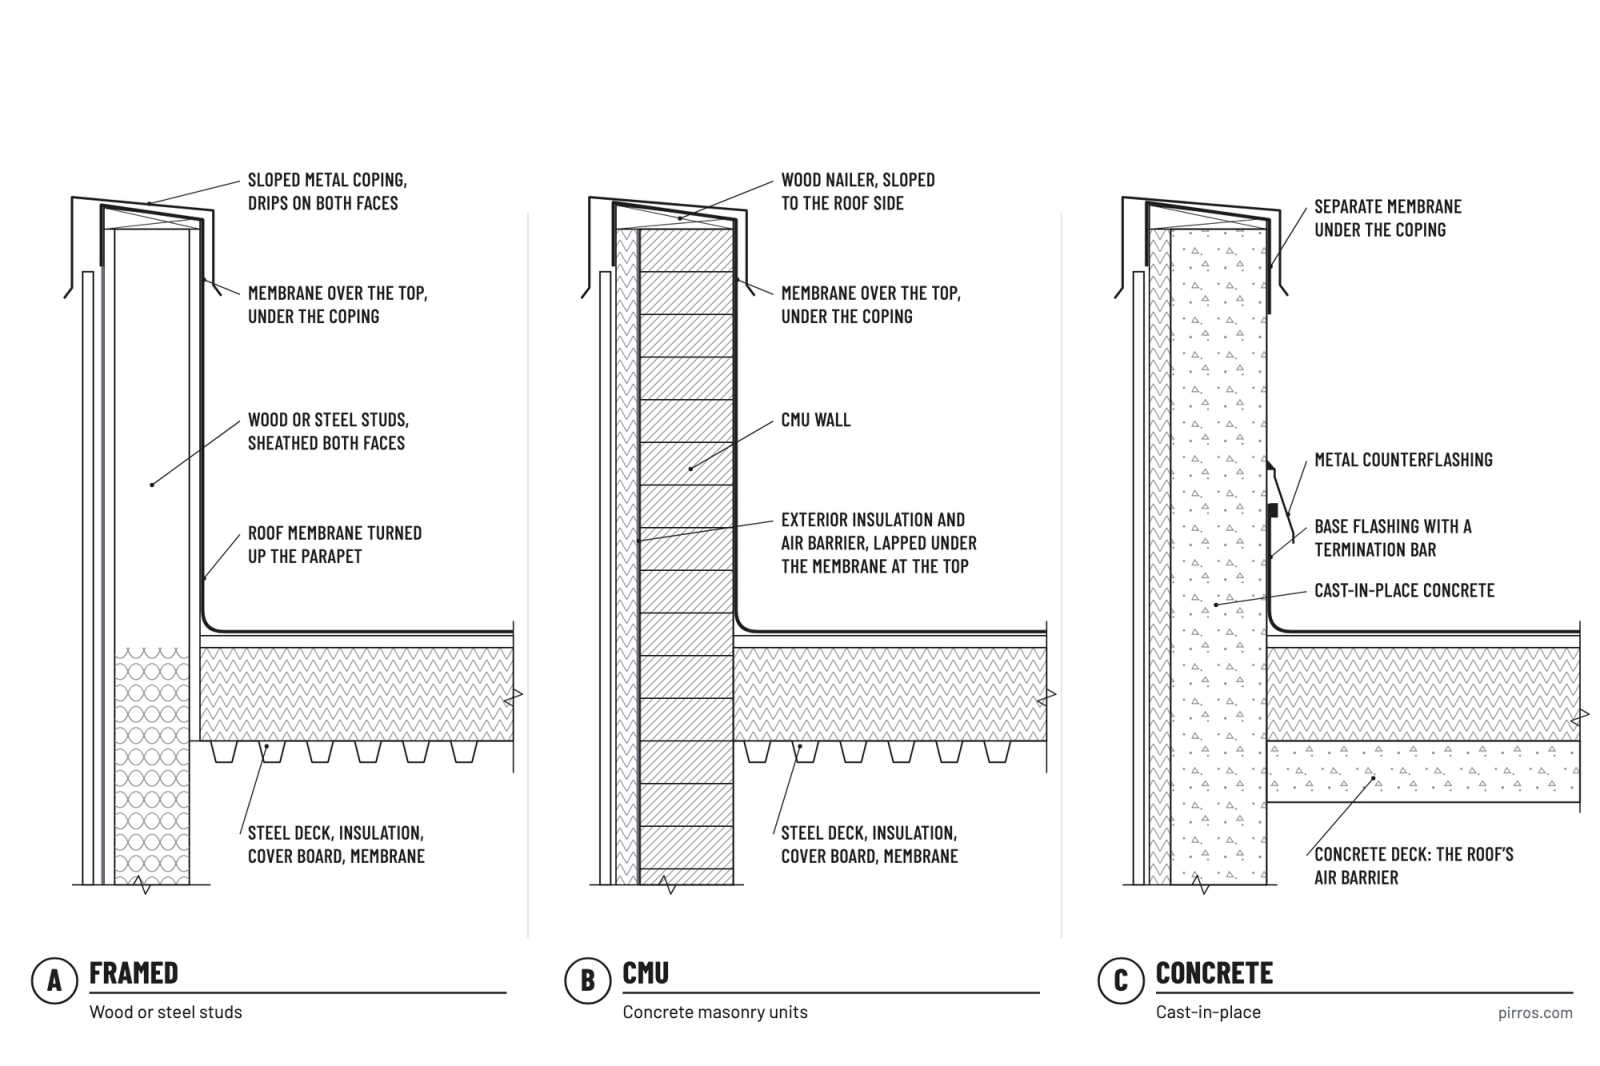
- Wood or steel framed. The stud cavity is a path for air. Vent each cavity of a wood-framed parapet, insulate it to the depth of the roof insulation and avoid balloon framing. A parapet open to the space below draws warm, moist indoor air into a cold cavity, where it can condense. The balloon-framed steel stud parapet is the hardest to get right: high-density spray foam has to carry the air barrier across the studs.
- CMU or concrete. In a masonry parapet on a concrete roof deck, the deck itself is the roof's air barrier, so the detail needs no separate one. The joints in the deck still have to be sealed.
- Cantilevered. A short parapet can be built out over the roof edge. Wrap the air barrier over the building's corner first, then build the cantilevered parapet on top of that seal.
- Curtain wall. Where a curtain wall runs past the roof, its head flashing ties into the roofing at the parapet. Our guide to curtain wall details covers that condition.
Parapet details, location by location
Most parapet details follow one principle, credited to the Canadian building scientist Max Baker: connect each control layer of the roof to the matching layer in the wall. That means water to water, air to air, vapor to vapor and insulation to insulation. Each location below is a place where one of those connections can get lost.
The top and coping
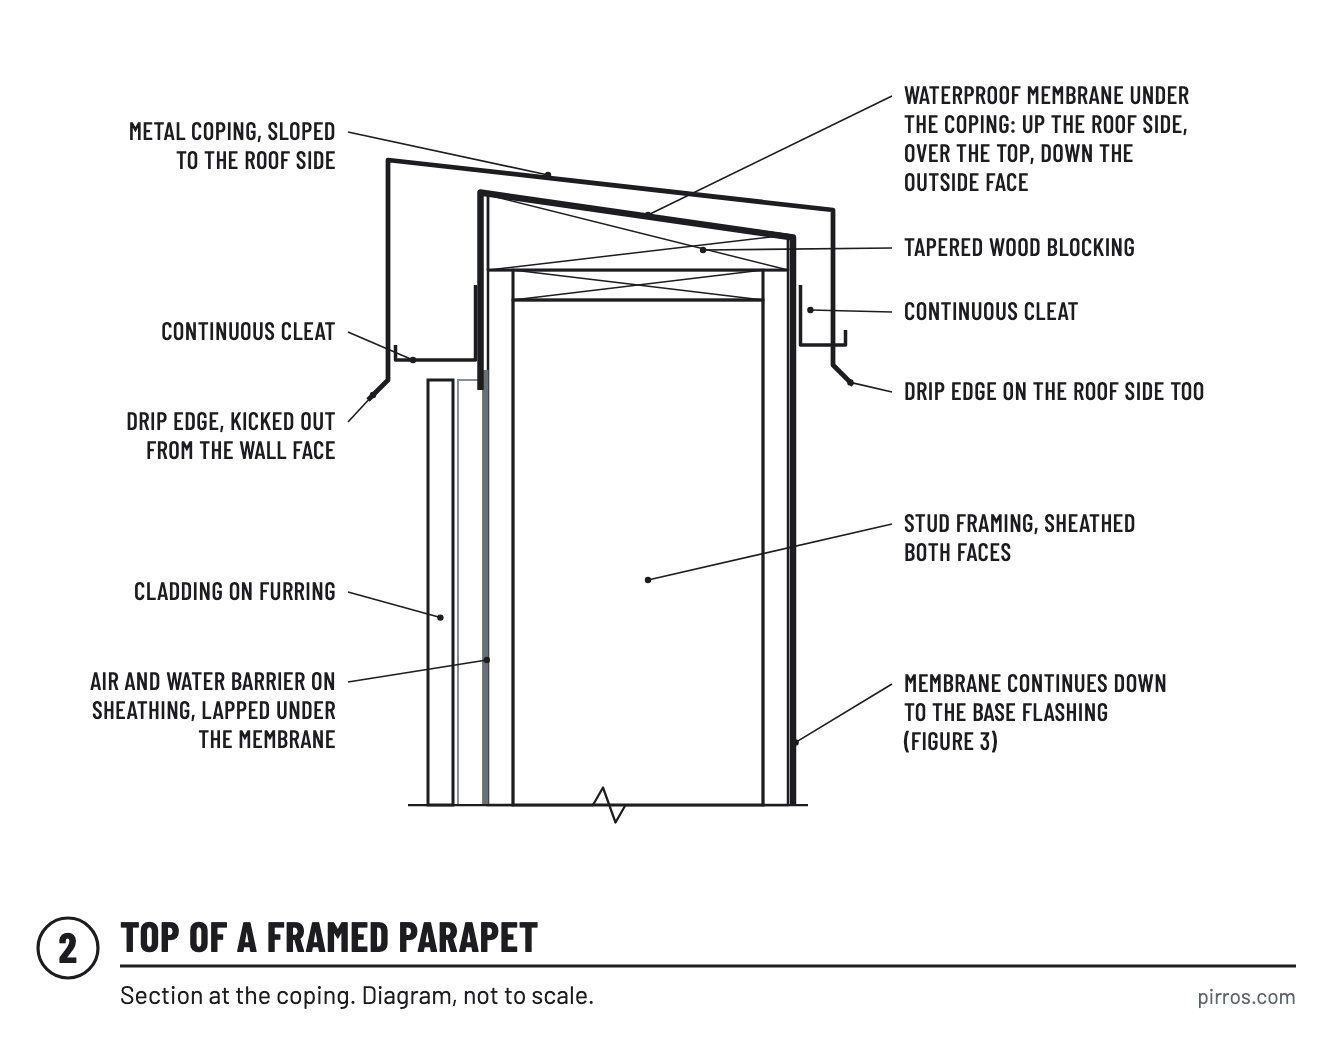
Keep water out of the top first. Three rules cover it:
- Slope it toward the roof, so water doesn't run down and stain the façade.
- Put a waterproof membrane under the coping every time, because metal and stone copings leak at their joints.
- Give the coping drip edges on both faces.
A typical parapet top uses a 24-gauge minimum metal cap over a sloped wedge, fastened with C-clips. Under the cap, the top of the parapet is sealed with a vapor-permeable fluid-applied flashing. Attach railings to the side of the parapet rather than cutting through the top, and take any penetration you can't avoid back to the design team. On a fire parapet, remember that the coping and counterflashing are part of the noncombustible top 18 in.
The roof side
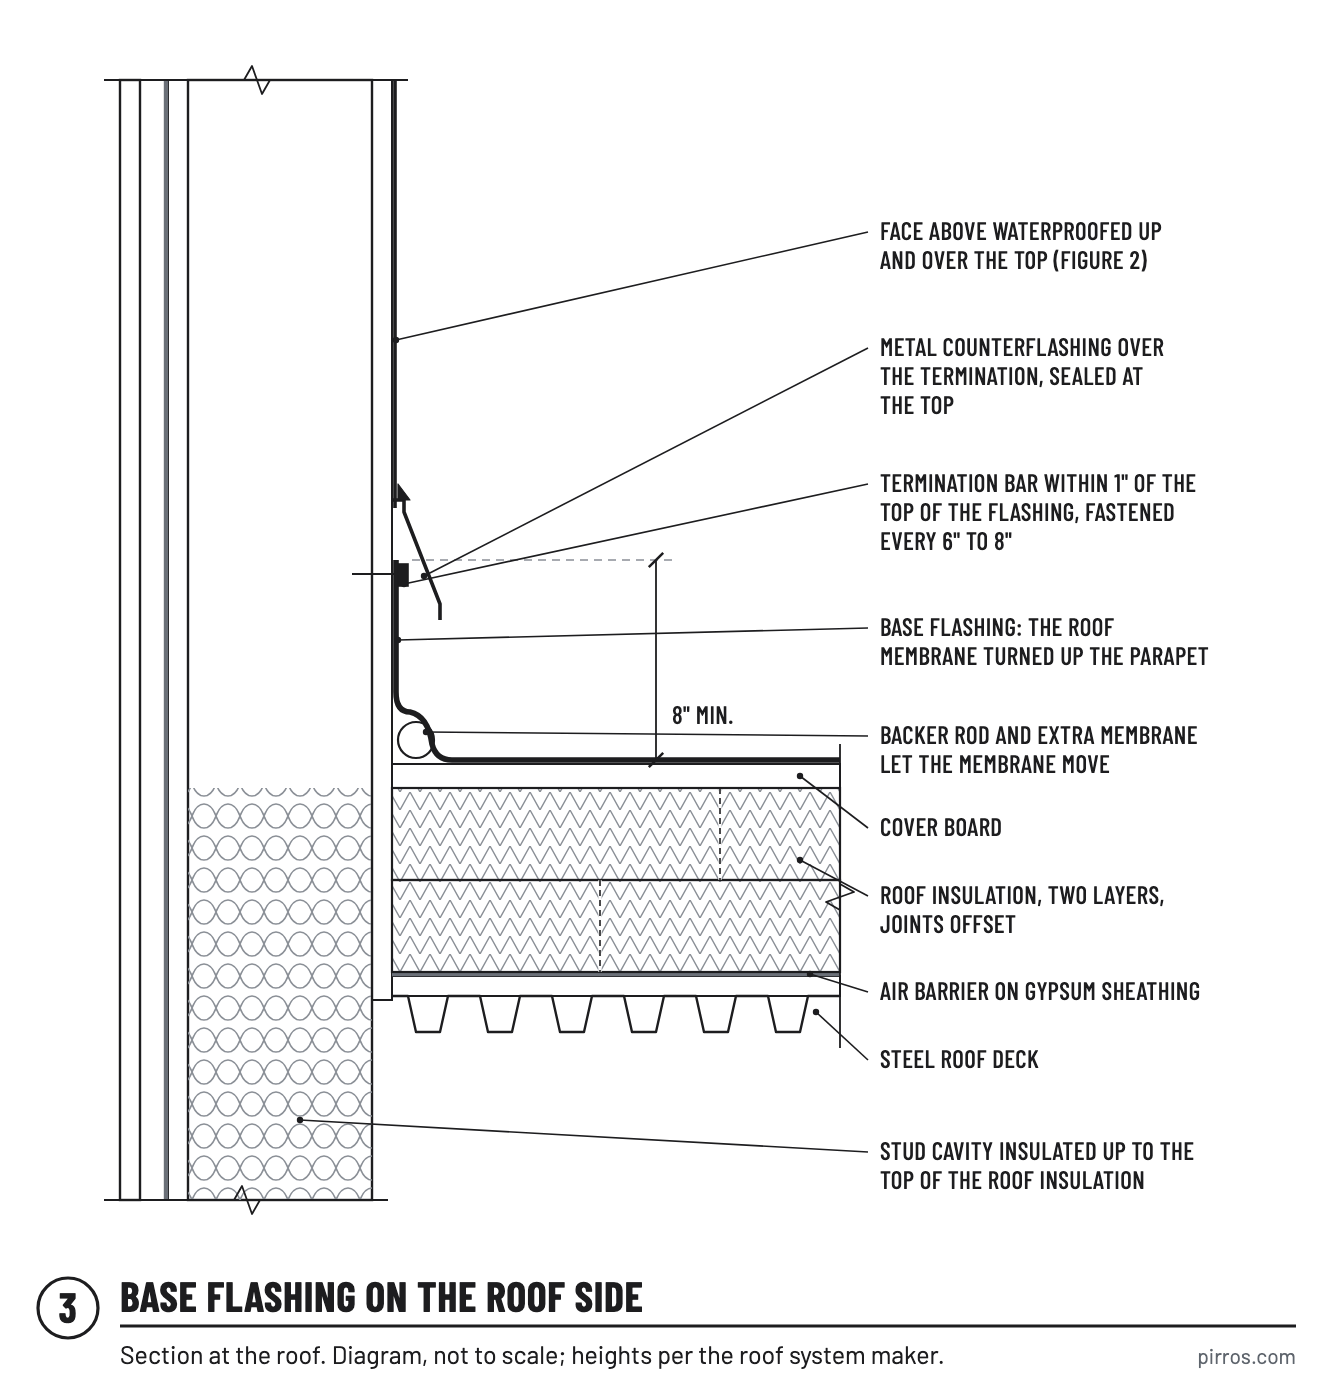
The roof membrane runs up the inside face of the parapet as base flashing. The industry minimum is 8 in above the finished roof surface, a height most membrane manufacturers recognize. Some builders' standards call for at least 12 in above the roof plane, or higher if the specification asks.
The membrane under the coping doesn't have to be the roof membrane. Some details carry the roofing up and over the top, as the parapet in our typical details gallery does. Others stop the roofing at a termination bar on the inside face and seal the top with fluid-applied flashing.
Three more things belong in the roof-side detail:
- Termination. Flashing needs a top termination so its weight doesn't make it sag. Use a termination bar within an inch of the top of the flashing, or a metal counterflashing, fastened every 6 to 8 in. Cover the bar with fluid-applied flashing over its top, face and fasteners.
- Height limits. Manufacturers publish maximum flashing heights. For bituminous systems the limit has stayed around 24 in without special precautions.
- Movement. Base flashing shouldn't be anchored to the parapet unless the parapet and the roof substrate are continuously connected and can't move apart. Counterflashing shouldn't be fastened to base flashing unless movement between them is prevented.
Movement is the one most often missed. A roof membrane goes through large swings in temperature. If its stress isn't carried down into the deck, the stress collects at the edge, where it can tear the membrane at the parapet or pull the parapet in. Older details restrained the membrane with wood blocking and a cant anchored to the deck. With today's more stable membranes, building scientists prefer a large backer rod under extra membrane, so the membrane can move.
The wall side
On the outside face, the wall's air and water barrier has to continue up and over the parapet to meet the roof's. One way is to run a fluid-applied water-resistive barrier from the termination bar up and over the top, or cover the transition with a vapor-permeable strip.
Two more connections finish the wall side:
- Insulation. The wall's insulation sits outside the structure, like the roof's, and the two meet at the parapet.
- The roof perimeter. Wrap the edge of the roof insulation so air can't flow from the parapet into the layers of rigid insulation in the roof.
Our wall section guide shows where this connection sits in the larger drawing.
Corners and ends
Corners and ends are where the coping turns, the membrane folds and the joints collect. Draw them as details of their own, not as notes left to the field. Cover the outside and inside corners of the coping, the end where a parapet dies into a taller wall, and every change in parapet height. Since copings leak at their joints, these are the places the membrane underneath does the most work.
What goes wrong with parapets
Flashing is the most vulnerable part of any roof. It's where the horizontal roof meets a vertical surface, often made of a different material, and flashing problems cause most leaks on low-slope built-up roofs. At parapets the same failures come back:
- No membrane under the coping. Water gets past the coping joints and into the top of the wall.
- Flashing stopped short of the 8 in minimum, or left with no termination, so it sags.
- A gap in the air barrier between roof and wall. Indoor air leaks into the parapet and condenses in the cold cavity.
- Thermal bridging where the insulation stops at the parapet instead of meeting the wall's.
- A torn membrane at the base, where thermal stress collected at the edge.
- A missing fire parapet, dropped from the elevations after a late roof change. Our fire wall guide lists it among the common rated-wall mistakes.
Drawing parapets in Revit
Model the parapet as part of the exterior wall. Then draw the details the model can't show at large scale.
- Height. In the wall's instance properties, set Top Constraint to a level and use Top Offset for the height above it. Revit measures Top Offset from that level. The code measures a fire parapet's 30 in from the roof surface, so add the roof build-up when you set the offset.
- Coping. A wall sweep adds a horizontal projection along a wall, and you can change its profile. Added to the wall type's structure, it runs along every wall of that type. A sweep with a coping profile shows the cap in elevations and 3D views.
- Details. A detail callout cut from the model shows the parapet as an underlay, with 2D components drawn over it, and it updates with the model. A drafting view holds 2D linework only, tied to no model elements. That's why firms keep their typical parapet details as drafting views they can carry from project to project.
Name each typical by the condition it solves. "Parapet, membrane roof, CMU backup" is easy to find; "Detail 7" carries no useful information about the detail. Our guide to architectural details covers naming and the rest of the set.
How Pirros helps
Most firms have drawn a parapet detail that worked well. Finding it is the hard part: it sits in a project from years ago, filed under a sheet number.
Pirros detail management makes past projects searchable by the condition each detail solves. You describe the condition, not the file name. Search "parapet at membrane roof, CMU backup," and Pirros reads the geometry and annotations inside each drawing to find matches. Every result is marked firm-approved or reference only, and duplicates are grouped with the vetted version marked. Details can require a senior sign-off before they land in a set. Pick one and insert it into the active view at your firm's scale.
See your firm's parapet details in one place
Book a demo to see how Pirros finds and places the parapet details your firm has already drawn. Working in Revit right now? Try Mira free.